Welcome to Neilpang's Blog!
记录生活,分享知识,传播乐趣-
Docker Compose 的网络模式
在 docker-compose 的原始版本中, 创建出来的服务都是全局的, 也就是说同一台机器上的所有 docker-compose 产生的container是可以互相访问的, 只要通过ip 就可以. 如果通过
link也可以通过name访问.在 docker-compose 的
v2和v3版本中, 每一个docker-compose所创建的所有服务(container) 共享同一个网络. 同一个网络内的服务之间可以通过name互相访问. 但是不同docker-compose产生的服务之间默认是不能访问的.要想解决这个问题, 官方推荐的做法是让需要跨网络访问能力的conainer 加入到多个网络中. 参考这有说明:
https://docs.docker.com/compose/networking/
如果在一些简单的情况下, 我们不需要这么复杂, 只需要让
docker-compose不创建独立网络, 而像以前一样使用系统的默认网络就好. 只需要加入:network_mode: bridge像这样:
version: "2.1"

services:
  app:
    image: ubuntu:latest
    network_mode: bridge
参考: https://stackoverflow.com/questions/43754095/how-to-join-the-default-bridge-network-with-docker-compose-v2
-
我开始喜欢_vscode_了
最近用上 vscode, 我开始喜欢上它了.
轻量, 插件丰富, 调试简单. 基本上可以做到 任何位置, 任何文件 开始调试.
-
远程调用selenium
通过 selenium 调用 firefox, 一般可以有两种方式:
- 本地调用. 通过 webdriver 直接调用本机上安装的firefox. 这种方式最简单直接. 坏处是你的代码和firefox 必须跑在同一台机器上.
- 远程调用. 在一台机器上跑 selenium server, 然后在另一台机器上用 RemoteWebdriver 直接操作这个 selenium server. 这个 server 中可以支持 firefox, chrome 等等. 最棒的是, 这个 server 可以跑在 docker 中.
今天主要记录一下第二种方式.
官方提供了一系列镜像: https://hub.docker.com/u/selenium/
仓库在这里: https://github.com/SeleniumHQ/docker-selenium
这些镜像基本上分为三类:
- standalone 类, 就是我们刚才说的server
- standalone debug 类, 跟 standalone 功能一样, 但是其中安装了 vnc server. 你可以用 vnc 直接连上去实时查看到firefox 的运行情况.
- node 和 hub, 它们可以构建集群.
这里我们选在第二类, 就是运行起来后用vnc可以看到结果的.
先起server:
docker run -d -p 4444:4444 -p 5900:5900 selenium/standalone-firefox-debug:3.141.59-neon这里有两个端口:
4444是server 的控制端口, 可以用浏览器直接访问.5900是 vnc 的端口. 可以用vncviewer直接连接. 对了vnc的默认密码是secert(密码可以改, 请参考官方的说明: https://github.com/SeleniumHQ/docker-selenium).登陆完成可以看到 桌面了:

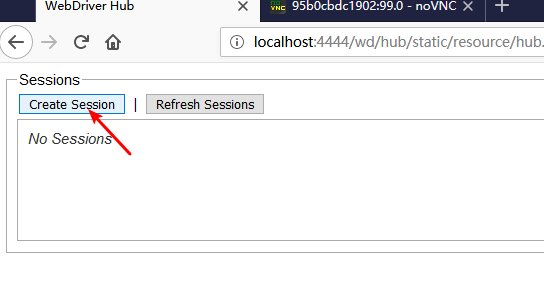
现在我们浏览器打开: http://localhost:4444/wd/hub/static/resource/hub.html
然后创建一个 firefox 实例吧:
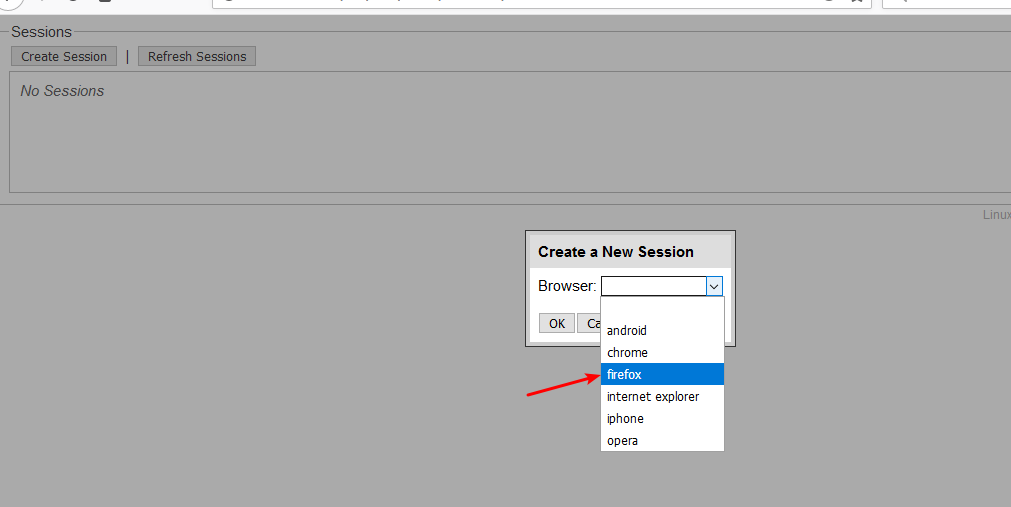
再回到 vnc 的桌面就可以看到了:

前面只是开胃菜. 接下来我们看一下如何编程访问.
在本机安装好
python以及selenium模块以后. 运行以下代码:from selenium import webdriver; from selenium.webdriver.common.desired_capabilities import DesiredCapabilities def test(): host = "http://localhost:4444/wd/hub"; capabilities = DesiredCapabilities.FIREFOX; driver = webdriver.Remote(host, capabilities) driver.get("http://www.baidu.com") test()你可以单步调试, 此时再看 vnc 桌面:
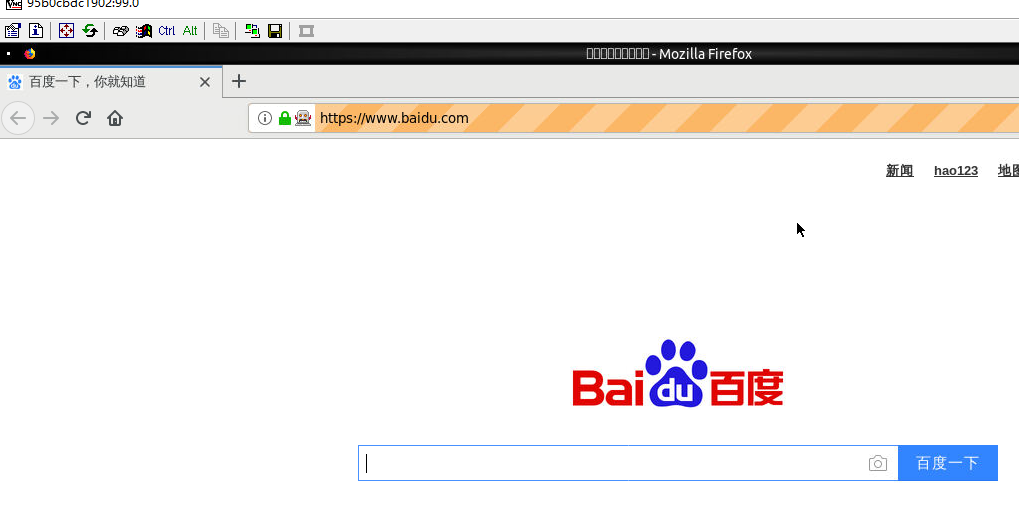
就到这吧, remote driver 和本地的 webdriver 接口一样. 所以用法是一样的. 其他的不罗嗦了.
到目前为止, 一切都很完美, 除了一点, 就是需要 vnc 客户端来访问桌面. 下一篇我们介绍用 novnc 来代替 vnc 客户端访问.
-
centos 6 如何安装 socat
由于socat 并没有在 centos 6 的默认源中. 无法直接安装.
有两个方法可以安装.
第一: 可以自己下载并安装这两个软件包:
- https://centos.pkgs.org/6/centos-x86_64/compat-readline5-5.2-17.1.el6.x86_64.rpm.html
- https://centos.pkgs.org/6/epel-x86_64/socat-1.7.2.3-1.el6.x86_64.rpm.html
第二: 可以添加源,然后yum 安装.
curl http://www.convirture.com/repos/definitions/rhel/6.x/convirt.repo > /etc/yum.repos.d/convirt.repo

yum update
yum install socat
-
opensuse:42.1 zypper 安装软件错误
zypper update 时出现以下错误:
bash-4.2# zypper update -y
Retrieving repository 'NON-OSS' metadata ---------------------------------------------------------------------------------------------------[\]
File '/media.1/media' not found on medium 'http://download.opensuse.org/distribution/leap/42.1/repo/non-oss/'

Abort, retry, ignore? [a/r/i/? shows all options] (a): a
Retrieving repository 'NON-OSS' metadata ...............................................................................................[error]
Repository 'NON-OSS' is invalid.
[non-oss|http://download.opensuse.org/distribution/leap/42.1/repo/non-oss/] Valid metadata not found at specified URL
Please check if the URIs defined for this repository are pointing to a valid repository.
Warning: Skipping repository 'NON-OSS' because of the above error.
Retrieving repository 'OSS' metadata -------------------------------------------------------------------------------------------------------[|]
File '/media.1/media' not found on medium 'http://download.opensuse.org/distribution/leap/42.1/repo/oss/'

Abort, retry, ignore? [a/r/i/? shows all options] (a): a
Retrieving repository 'OSS' metadata ...................................................................................................[error]
Repository 'OSS' is invalid.
[oss|http://download.opensuse.org/distribution/leap/42.1/repo/oss/] Valid metadata not found at specified URL
Please check if the URIs defined for this repository are pointing to a valid repository.
Warning: Skipping repository 'OSS' because of the above error.
是因为
oss和non-oss源无效了. 只需要移除这两个源即可.zypper rr OSS NON-OSS
-
pfsense 可以直接安装 freebsd 的软件包
pfsense 可以手动安装 freebsd 的软件包. 只需要三步.
1. 在这个页面搜索并复制软件包的链接: https://pkg.freebsd.org/freebsd:10:x86:64/latest/All/
2. 执行pkg add:pkg add https://pkg.freebsd.org/freebsd:10:x86:64/latest/All/socat-1.7.3.2_2.txz- 执行
rehash
rehash参考资料:
1. https://forum.pfsense.org/index.php?topic=46116.0
2. https://doc.pfsense.org/index.php/Installing_FreeBSD_Packages
- 执行